Friday, April 29, 2011

New Quilt for 2011

I've started working on a new quilt for 2011... which I actually started in 2010 but I do have a tendency to procrastinate. Since I started the quilt over a year ago, I couldn't remember what I was planning to do so I had to think of a new pattern. When I decided to revisit the quilt over the Easter/ANZAC long weekend, I had 172 four patch blocks measuring approximately 14cm x 14cm... well, on average anyway. I know quilting is all about precision but no matter how careful I am with the cutting and sewing I can never get them all the same. I like to say that I follow the Amish style of quilting with humility corners (making mistakes on purpose as the Amish believe that only G*d can make something perfect). To be honest, the imperfections on my quilts are not deliberate, but life isn't perfect afterall, and it's the imperfections that makes something unique and adds to the charm (so I tell myself!).

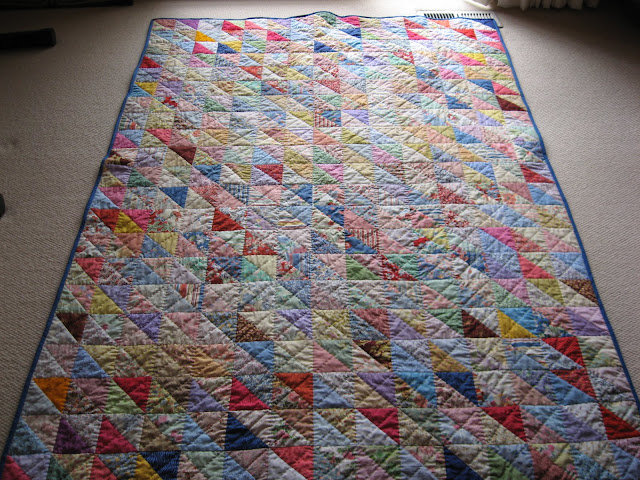
I've decided on a variation of the Stacked Coins pattern for Quilt 2011, and I'm drawing on inspiration from a quilt I completed in 2009 (below) which took about a year to complete as I prefer to hand quilt (I like the lumps and bumps that only hand quilting can achieve). I'm now deciding what colour fabric to choose for the main background and I'm thinking green. Here is what I've completed to date.

I see life and living as a patchwork quilt - it's filled with an array of colours, some of them bright and beautiful, others more muted and somber. When sewn together, our eyes are naturally drawn to the more vibrant pieces, but it is the duller patches that enhance the beauty of the brighter pieces. Some blocks are a challenge to sew - do you unstitch the pieces and start again, leaving marks etched on the fabric; do you stretch or cut the pieces to try to make it fit but end up distorting the block; or do you discard it and start afresh? The answer depends on the situation at hand, but whatever action you decide to take, it is something you have to live with.

Thursday, April 28, 2011

Cherry Cross Stitch

One of the things I like about Summer is eating cherries. I adore cherries and once Mum and I made cherry jam, and I had red stained finger tips for a week as I de-pipped the pips! Not only are they delicious but I find them beautiful. I've captured the essence of Summer by cross stitching cherries onto a table runner. The project is not as daunting as it looks as it requires only four different embroidery floss colours (I'm not sure about other cross stitchers, but I hate changing colours!).
 I've almost completed one side so I'm hoping that posting a blog entry about it could motivate me to work on it more often so I could eventually photograph the finished project. It's one of the reasons why I started writing this blog; definitely not to have an audience (as my life isn't really that exciting to document), but it could perhaps get me to do more different things to make my life more interesting, and not to procrastinate and finish what I start!

I definitely need to wash the table runner when it's completed as the photo does not show the little smudges of chocolate from the Tim Tams I've been eating. For those of you not familiar with Tim Tams, they are the most delicious biscuits ever made (seriously, this is a fact) and they are even sold in packets containing 11 biscuits, because you just need that extra one! Pure genius Arnotts!

Wednesday, April 27, 2011

Fish Patties


This is the second time I’ve made these patties but I used tinned tuna (because we only had tuna in the pantry) instead of salmon which turns out just the same. My version was inspired from a recipe from http://www.taste.com.au/
  • 1kg potatoes
  • 500g tinned tuna (drain liquid)
  • 2 egg yolks
  • 1 carrot, finely cubed
  • Couple of handfuls of frozen peas
  • Couple of handfuls of canned corn kernels
  • Dried breadcrumbs 
 Boil potatoes and mash. Add tuna, egg yolks, carrots (which I microwaved for 90 seconds to soften), peas and carrots and mix together. I used an ice cream scoop to make 24 even portions. Shape into patties and cover with breadcrumbs. You may wish to refrigerate for a couple of hours, but you can pan fry until golden brown if you wish to eat them straight away (like me). I tend not to season with salt and pepper (mainly because I forget) but a little seasoning or a sprinkle of herbs will add a wow factor (ok, perhaps not wow, it's only fish patties afterall).
I’ve served the patties on a bed of couscous for lunch, eaten on its own with a little chutney, or like any Chinese household, can be eaten with rice :)

Tuesday, April 26, 2011

Masterchef Apron - Cross Stitch Cake


I made this apron last year for my good friend C who lives in Singapore. C does a lot of baking so I thought a 'Masterchef' title was appropriate for a woman of her culinary talents. I confess that I didn't make the apron but I did cross stitch the motif (cake pattern from one of my favourite books Made in France: Cross Stitch and Embroidery in Red, Whte and Blue) and sewed lace around the apron. C told me she wore the apron at a bbq and the kids asked whether she was on the Masterchef series! Well I suppose it does look pretty official if I do say so myself :)

Really Easy Pizza

I'm not sure whether this is classified as "cooking" as it's more assembling pre-packaged ingredients, but nevertheless it's a quick and easy meal in 30 minutes. I came back from a walk and was famished so I'm replenishing the energy I've just walked off by eating gooey pizza (or do I exercise so I can eat such goodies?)
  • Pitabread (I use wholemeal to try to be healthy)
  • Slices of salami (optional but I can't resist!)
  • 1 bottle of chargrill mix vegetables (antipasto) - [I prefer the Woolworths brand as it actually contains a mixture of vegetables rather than the Coles brand where a mixture consist of eggplant and 1 slice of capsicum where half the bottle contains oil]
  • Bocconcini cheese sliced
  • Mozzarella cheese (for the gooey bits)
 Assemble ingredients and pop them in the oven for 20 minutes. The pitabread base is crisp and most importantly, there are plenty of gooey bits!

Saturday, April 23, 2011

Beaded Hangers


I made a few of these beaded hangers last year (when I obviously had too much time on my hands). During her visit to Melbourne a few weeks ago, my Aunty Jenny took a couple back with her, and when my Grandmother saw them got rather upset that they were not for her! Ladies - lets not fight over hangers ok?! One of my favourite lines from How to Make an American Quilt: "Bicker, bicker, bicker, makes a girl age quicker!"

Updated 23-Apr-11: Aunty Jenny said that the hangers are still in her cupboard but she anticipates that they will slowly slip away to Grandma's cupboard!

Photobucket

They are super easy to make; all you need are hangers and Pony beads. Untwist the twisty bit, tread the beads through, and retwist the twisty bit. Voila - instant Hanger Glamour!

I bought the hangers from Daiso (Melbourne store), my most favourite bric a brac store ever. I went to the Harajuku store twice when I was in Tokyo in November 2010 (4 storeys of everything I didn't realise I needed). Pony beads are getting harder to find and can be rather pricy but I managed to buy a packet from Riot Art and Craft who are currently having a sale.

So this is how I've spent my evenings this week - threading beads onto hangers while watching Boardwalk Empire where I found out what Lysol was used for. Ick! On the other hand, how versatile, a multipurpose product that is both a germ and sperm killer!

I woke up early this morning and went for a walk with my parents for about one hour and enjoyed the beautiful Autumn colours.

Thursday, April 21, 2011

Craft Supplies

I was checking out the Frankie magazine website and stumbled across what appears to be a fantastic craft online retailer called Yozo Craft. Oh dear, I’m trying to cut down on my craft spending so knowing about this shop is not going to help! Just bought 2 lots of a cotton/linen fabric for less than A$9 which includes postage. Can't pass such a great bargain!

Tuesday, April 19, 2011

Effie & Ollie Elephant

My friend Bernie (whom I made the "Beware: Artist at Work" cross stitch sampler for) sent me a belated birthday present a few weeks ago and I couldn't wait to make the Heather Bailey elephant pattern she sent me.

I thought it would take me a couple of hours, but about 5 hours later I managed to complete it. I must admit that I'm not the most competent sewer so it's me rather than the pattern which was easy to follow. The curved sections were a bit tricky which is why I took longer than anticipated.

The fabric was one of the presents too, so here is my new elephant pin cushion!


Monday, April 18, 2011

Spinach, Ricotta and Feta Filo Pie

I woke up early on Saturday morning and made a spinach/ricotta/feta pie from a recipe I found on http://www.taste.com.au/ I bought the ingredients a couple of weeks ago and had to make it before the low fat ricotta passed its use by date. It required the zest of a lemon, so from my last post, there is still 3 lemons remaining minus one with zest!

Squeezing out the liquid from the frozen spinach was a really messy job and I probably should have spent more time at it but I was making a green liquid mess not to mention the bits of spinach going everywhere! I mixed everything in the bowl, and then layered 4 pieces of filo pastry (it's tricky to handle the thin pastry) and folded it in half so there was 8 layers which is what the recipe required. I cut the filo into quarters and lined the filo into a Texan muffin tray. I then scoped the spinach mixture into the casing and popped it in the oven for about 30 minutes.
 

I love eating things straight from the oven (though my Chinese upbring keeps nagging me that it is too"heaty") but nothing beats the taste of freshly baked goodies from the oven. Yum!

Sunday, April 17, 2011

Australian Women's Weekly's Lemon Cupcakes

I was feeling rather domestic on Friday evening so I decided to bake some lemon cupcakes (well I really didn't want to see the bag of lemons I bought go to waste. I don't know why I buy things just because they're cheap!). The recipe is from the Australian Women's Weekly Cakes Biscuits and Slices book, and their recipes are easy to follow and always turns out well. I picked up a cute cupcake tin from IKEA a few weeks ago which is smaller and narrower than regular cup cake tins so the cakes turn out like little mushrooms! I was actually thinking about decorating the cake with red icing and putting white chocolate buttons to make little toadstools :)
  • 125g butter, softened
  • 2 teaspoons finely grated lemon rind
  • 275g caster sugar
  • 3 eggs
  • 225g self raising flour
  • 125ml milk
  • 60ml lemon juice
1. Preheat oven to moderate. If making a whole cake, grease 20cm deep round cake tin, line base with baking paper.

2. Beat butter, rind and sugar with electric mixer until light and fluffy. Add eggs one at a time, beating until just combined between additions (mixture might separate at this stage, but will come together later). Stir in sifted flour, milk and juice in 2 batches.

3. Pour mixture into pan; bake about 50 minutes. Stand cake for 5 minutes; turn top-side up unto wire rack to cool.

I was oohing and umming about whether to make icing as I tried to search for low fat icing (no such thing!) so I settled on a basic icing (mix 2 cups of sifted icing sugar, 20g melted butter and juice of one lemon) that complimented the cake perfectly.

One of the best products I have found is the disposable icing piping bags by Multix that contains 5 plastic piping bags with 3 nozzles (I was at 2 minds - contribute to more plastic in our landfill or waste litres of water trying to wash a cloth piping bag?). Since Victoria still has water restrictions, I'm afraid I went with the plastic piping bags.
So what do you think? I did a Nigella Lawson and did devour the big cupcake cake straight after I iced it. Bliss!

I only used up 2 lemons... what to do with the other 3?